Pages

Tuesday, January 6, 2015

Tutorial. 5 Petal Flowers


Hello all. It's being long time from my last tutorial. Ladies often asking me to make tutorial on how i making my flowers, and today i like to show you how to make 5 petals flowers. Well it's your choice on how many petals you like to make your flower.
Lets get started.
I used 1" wide ribbon, white pencil to make marks where i will stitch. And you need something round for the petals marks. As you can see, i used smaller ribbon topping.
Place your circle on the ribbon and draw a line around, with white pencil . Do this 5 times and it will make you 5 petals.


Then stitch true the marks


Now pull tread together and secure with stitching ends together


For the centre i chose glass pearl bead. You can add button or gems, whatever you like.


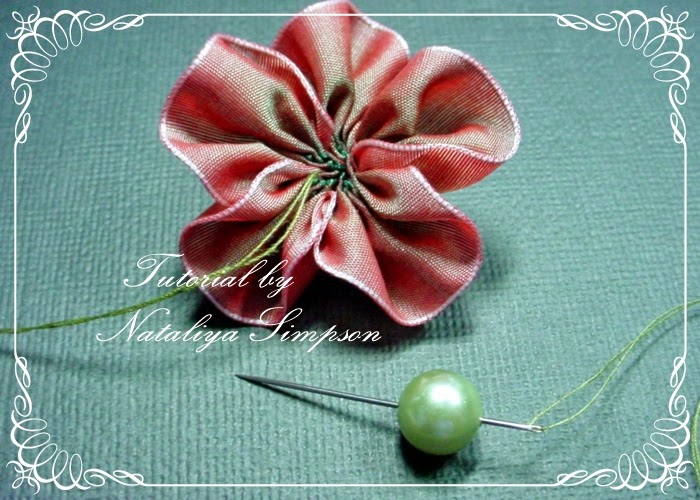
Now on the other side you can trim ribbon or wrap with floral tape add wire, some lives and put in the vase.


And now we have simple, but pretty flower, that we can use for anything; hair clips, scrap-booking, cards making, add to your dress...... you got the idea.
Please live me your comment if it's helpful to you, or if you have any questions, or what next tutorial would you like to see.
Happy crafting!!!
Hugs Nataliya.

Friday, May 10, 2013

Decoupage Tutorial #2

Hello my awesome followers. Today i like to use Image Ring Mistress Circus Showgirl by Rick St. Dennis for my Decoupage tutorial.


 You can find this image HERE. So lets get started;
First you need to print Digital image 3 or 4 times, as many layers as you like. I printed image 3 times. Then you need to look good how to layer image to make it 3D'. My main  image i colored all shadows first with Prisma Pencils, and you already see how it's made my image pop out of the paper
Now lets do some colors.
On this Photo you can see how i colored my first image. You need to remember, after you layer all of them, you not going to see the middle of the image. So why color??? Right???

Now lets put our image together by using some pop dots or 3D glue
Here is what i have on the end
I love all the layers, and she looks like a Doll
And the other side
I think she is ready for the SHOW.
 And here is my card.
I hope this will help you to create your own Decoupage projects. Let me know in the comments Box if this tutorial was helpful . I would love to hear from you.
Hugs Nataliya

How if you like to start making money of your Blog click this link.

Tuesday, April 9, 2013

EnveloBox Tutorial

Hello ladies. Most of my square cards are 6"x6".  And i never can find an Envelope to fit my cards, so i made one.  I know we have many tutorials on the web, but i just didn't understand them. So here is how i did. I used MS score board, if you don't have one you can use ruler and score tool. I have here on first Photo Paper12"x12" square. I put my 6"x6" card right in the middle of this page, and that's how i find out where to make my first score, make sure to have your page in this positions like on this Photo.
I made my Envelope little bigger then a card, so my envelope is 6"1/4x6"1/4.  Score like you see on the Photo. Do this on all 4 sides. Then you need to put your card flat and see thickness of your embellishments. Measure that,  and that's where your next score will be 4" 3/4.  do that on all 4 sides of your page.
after you did all scores, cut out all corners
You will have something like this. Fold your scores.
You can use corner punch, to make your flips round (but you don't have to do this)
all you need to do now, is to glue all together.


I find Zip Dry glue is the best, it's drys very fast and strong. I got mine from Wall-Mart. 
And now you have prefect envelope for your bulky cards. If you like you can also decorate your envelope to match your card

 And here is my card with gorgeous digital image "Kisme T" by Rick St. Dennis. You can find it at Etsy Shop.
 As you see here, i have some bulky Flowers on my Card, and my EnveloBox just prefect for it.

Look out for another tutorial, how to make 6"x6" Box from your 8"1/2x11" printer size cardstock. I like to know what do you think about this tutorial, and i hope this will help you to make your own EnveloBox.
Hugs Nataliya

Thursday, December 6, 2012

Tutorial on how to Decoupage digital image and use of Flocking Powder

First you will need to print this image 4 or 5 times (i did 4 here). then you cut them out as you like and color. I didn't color on the inside because you will not see that part after your image put together.
You can buy this image HERE at  http://scrapbookstampsociety.com/index.php.
To put parts together i used 3D's sticky tape
And last part of Deco, which you must color all the way. On Photo below you can see what i used to create this image. Glossy Accents i used for the Nose and eyes, And Flocking Powder for the Fur.
Lets begging Flocking!!
I started with the smallest area with White flocking. You can use any Glue, i used glossy accents, its drys faster. After every layer you need to brush out what is left after each color. In this case i'm using make up brush (now it's crafty Brush).  Here is my prefect tool to pick it up Flocking.
and brush off the left overs. Little by little add other colors and....
.....here what you will and up with. Thaaa-daaaa!!!! It's ready for your Project.
Well...almost ready. You can add some Micro beads or glitter for more sparkles, after all it is christmas Image
Just a Photos of different side view on 3D's look


And here is my Finished Project -Wall Frame. If you like to see better all details about this Frame, Hop on over to my other Blog HERE. Happy crafting!!! Hugs Nat

Friday, March 16, 2012

Triple Easel Card Tutorial

First you will need for this Triple Easel card a Cardstock 11" x 5.5 ". Score on the middle by 5.5 "
Then one half you score one more time like you do your regular Easel card. This what you should have
Now we heed two of 5.5 " x 5.5 " squares. And you do the same, as first card. Fold on half, and one half, one more time on half
Now you must have two mini Easel cards
For me easy to glue this mini cards together if i add glue strip on the bottom of one card and i flip over other one up side down and put glue strip on the top part as you can see on this photo
Then you line up two card inside  like so
And make sure your lines with the glue goes perfectly together
After you did that, you will have this
Now flip over this cards and put glue strips on the top and the bottom
Now we need to add this mine Easels to our First big Easel card.  I start to glue them from the bottom , that way it will be all lined up, after your folds folded down.
Here is your card all ready to be decorated
After your folds down, your card should looks like this
And here is my finished card
Will like to know, what you think about this tutorial. I really hope you can use it.
Hugs Nataliya